Introduction
This tutorial is designed to get you up and running with a very simple contract example – as such we will omit a lot of information for the sake of achieving something tangible quickly. We will also brush on a few topics that will be expanded on in later tutorials – for now if something doesn’t quite make sense it is best to push forward until we cover things in depth later on.
And now, onwards to a decentralised web! Please join us on IRC or our forums if you have questions!
The basics
Ethereum enables the decentralised web, referred to as ‘web 3’. What makes it different from web 2 is that on Ethereum, there are no web servers, and therefore no middlemen to take commissions, steal your data or offer it to the NSA, and of course nothing to DDoS.
A Dapp (‘decentralized app’) consists of two parts: a frontend, written in HTML, and a backend (think of it as the ‘database’ for your frontend).
Good news: if you like bootstrap, or any other framework, you can continue using them, as the frontend of dapps have full network access, and CDNs are accessible. In fact, for all intent and purposes, developing a frontend for a Dapp written HTML is the exact same as developing a website, and converting from web 2 to web 3 is in many cases trivial.
Even better news: you get reactive programming baked in (which should please angular, meteor and derby fans), by simply using callback functions, and there’s no new framework to learn.
Even even better news: because Ethereum relies on cryptographic principles to function, every Dapp knows the pseudonymous identity of each user. That’s right, users won’t need to ‘create accounts’ or ‘log on’ to access your dapps, and you can think of this as open ID by default, everywhere.
There is no bad news, except maybe for the bad actors from the web 2 world, such as dishonest exchanges running with the money or gambling sites falsifying random number information to make a quick buck. On Ethereum, the backend operations are validated by all nodes on the network, meaning that a backend will always will do what its code says it does. This is why you might have heard people call Ethereum ‘trustless’ – there’s no need for users to trust into a central authority to ‘do the right thing’.
This tutorial will focus on your first steps using Alethzero (our development client), and the creation of a simple coin contract – the backend of your Dapp.
Installing the client
Important Note: The client is currently in a state of flux, and the most stable version is the master build which you will be using. If you are feeling brave feel free to switch to the latest ‘develop’ client but please note that this tutorial has not been tested to work with this version.
We’ll be using Alethzero, the C++ implementation of Ethereum designed for developers. In particular, we’re going to install the ‘master’ version, which is stable and contains all the latest features.
Binaries are available for OSX and Windows here. Ubuntu should be installed by following these steps.
A quick overview of Alethzero:
If all went well, you should see something like this after you start Alethzero, depending on your platform and screen resolution:

If your resolution varies, and not all the interface is visible, manually close all panes in the display by clicking their ‘x’ symbols until they are all gone, resize the screen to fit your resolution and re-add them manually by right clicking just below the title bar (and just to the right of the ‘refresh’ button).
What’s going on here? At the centre of the screen is a browser window, a Webkit view to be exact. You can browse the existing web from there, just like any other browser, try Google for example.
The rest of the panels contain debug and technical information that we’ll make use of a bit later. While useful for developers, this is not a very-user friendly interface, so the final Ethereum browser, tentatively called ‘Mist’ and built on top of the Go Ethereum implementation, will have a completely different look and feel. In fact, it’s likely that once Ethereum is launched, the ether browser will look a bit like this:

The above is a concept of a potential look and feel for the ether browser “Mist” being developed by our Amsterdam team, accessing a Dapp that itself acts as a Dapp store.
As far as options are concerned, feel free to reorganise your screen a bit. You can also drag and drop panels on top of each other to ‘stack’ them.
Choices, choices
Ethereum is a generalised programming platform. You can build games, financial applications, gambling apps, insurance companies, social networks, well, anything really! That said, it’s always good to keep in mind your users’ needs first and foremost, so what do you think they are missing from the centralised web? Well, trust of course!
So, for today’s tutorial we will write a simple contract which functions a bit like a bank, but with a transparent ledger that the whole world can audit. We’ll issue 10,000 tokens, and because it wouldn’t be much fun to keep all the tokens for ourselves, we’ll also create a method that allows us to send them to our friends.
This way, we are issuing our own money (in a very basic way, but still). In the web 2 world it would be similarly trivial to build such an app in PHP and MySQL, but your users would have to trust you with being an honest accountant, that your ledger stays consistent, that the government wouldn’t ‘help’ itself with some tokens, that hackers wouldn’t break into your server, that your employees would be honest at all times and hadn’t planted a backdoor, or that your programmers wouldn’t have made a single mistake, ever… well, you get the point.
Our Contract
Our backend (referred to as a ‘contract’ in Ethereum) is going to use a language called Solidity. There are several other contract languages you can use when building Ethereum backend, LLL (similar to Lisp) and Serpent (similar to Python). We’ll use Solidity as it is the formally supported language by the ETHDEV team.
As we mentioned above, we’re building a little bank, so we’ll need to do two things:
1) Instantiate at least one account with a balance of tokens, to get things rolling when the contract is first created.
2) Build a ‘send’ function similar to contract.send(account, amount) in order to move tokens around.
Let’s dive in, and feel free to open your favourite text editor to edit your first contract!
contract metaCoin {
	mapping (address => uint) balances;
	function metaCoin() {
		balances[msg.sender] = 10000;
	}
	function sendCoin(address receiver, uint amount) returns(bool sufficient) {
		if (balances[msg.sender] < amount) return false;
		balances[msg.sender] -= amount;
		balances[receiver] += amount;
		return true;
	}
}
Don’t panic, it’s much simpler than it looks. Contracts are divided into methods. The first method, entitled metaCoin, is a special constructor method that defines the initial state of the contracts data storage. Constructor functions always have the same name as the contract. This initialisation code is run only once when the contract is created, and never again.
The second part of the contract is the contract code itself, the stuff that will live forever on the Ethereum network, immutable, and backed by millions of nodes insuring it returns the expected results every time. In our case, it’s a simple function that checks that the sender has a large enough balance and, if so, transfers the tokens from one account to the other.
Let’s look at this in a bit more detail:
mapping (address => uint) balances;This line creates a mapping in storage where your code can strictly write information to the contracts storage – here we have defined a mapping for key value pairs of type address and uint called balances. This is where we will store users coin balances.
Note that we have specified two data types, address and uint. Unlike Serpent, Solidity is statically typed and will perform type checking at compile time. Specifying the type before compiling also allows us to reduce the size of the data array passed by transactions, and allows the compiler to create more optimised EVM code.
	function metaCoin() {
		balances[msg.sender] = 10000;
	}
This is the initialisation of our contract: it will only run once (because it’s within the constructor method ‘metaCoin’), and it is doing a couple of things; Firstly, it uses msg.sender to lookup the public address of the transaction sender (you in this case). Secondly, it is accessing our contracts storage by using our mapping balances. Contracts store data as a key value pair both 32 bytes in length.
msg.sender is a 160bit number denoting your public key. This is a unique identifier on the network that cannot be forged, thanks to the cryptographic laws that Ethereum implements ‘under the hood’. There are other things that contracts can ‘trust’ about the transactions they receive and the blocks in the chain – we will explore these in other tutorials.
Now we have assigned ourselves an initial balance, let’s have a look at the ‘sendCoin’ function, which will be executed each time we call the contract from now on. This is the only executable function a user can call – our initialisation function cannot be called again.
function sendCoin(address receiver, uint amount) returns(bool sufficient) {
		if (balances[msg.sender] < amount) return false;
		balances[msg.sender] -= amount;
		balances[receiver] += amount;
		return true;
	}
This function has two arguments passed to it by the transaction: receiver is another 160 bit public address of the recipient and amount is the number of tokens you wish to send to the receiver.
On the first line we are going to check the current balance of msg.sender is less than the amount of tokens we wish to send – if it is we return empty and do not execute the next two lines of code. This makes sense as the account calling the contract is the one that is sending tokens, and it must have sufficient tokens to complete the transaction.
So, the three arguments passed to our function ‘transfer’ in order to transfer tokens from one storage address to another are: msg.sender, receiver and amount.
If the balance checks out, the conditional will evaluate to false and the next two lines will subtract the amount being sent from the sender balance: balances[msg.sender] -= amount;, then add to the balance of the account receiving the tokens: balances[receiver] += amount;.
So now we have a function that will send tokens from the control of one account to another.
Don’t run out of gas!
Before we go further, there is an important concept you need to understand that will help you master ethereum contracts: gas.
Let’s peek under the covers: in order to power the decentralised web, Ethereum cannot possibly rely on any centralised authority (because that authority could manipulate the database). Instead, every node that participates on the network holds a copy of a decentralised database, which they audit.
The network nodes process the code that is being executed in the database and come into agreement as to what the correct state of the database is through a vote. Majority always win the vote, and nodes are incentivised to do this verification work. Voting takes place at regular particular intervals, on average every 12.7 seconds.
The contract we have written earlier will be stored in this database. Contracts are triggered and executed when users or other contracts call them.
If you were thinking that this necessary approach presents limits in terms of processing speed, you’d be correct. The total processing power of the Ethereum network, regardless of the number of nodes that forms it, is equal to a single smartphone from 1999. This means that you’re not going to want to store megabytes of data on the Ethereum network, or render 3d graphics. There are of course workarounds to this, including our upcoming storage solution called Swarm and our secure messaging protocol, Whisper, both companion technologies to Ethereum.
It also means that because computing power is limited, it has to be measured carefully so that no single actor can commit evil deeds such as running infinite loops on all the world’s Ethereum nodes. This unit of measure is called ‘gas’.
Gas comes into play when you try to make a contract do something. You ‘call’ a function of the contract, which then executes the code in that function. It could be validating an escrow, or ‘like’ a friend on a decentralised social app, or transfer an amount of contract-specific token to another user, etc. Anything.
In order to execute this function, the contract will need gas, just like your car does. So, as part of the function call, you specify how much ‘gas’ you want to send to the contract, and how much you’re willing to pay for that gas (priced in ether, Ethereum’s fuel and unit of account).
The different operations a contract can support are priced differently. One execution cycle cost one gas for example. Others, like writing to storage, cost considerably more (because storage is a very scarce resource).
If you send too much gas to the contract, and it doesn’t use all of it, it is refunded to you. If you send too little, the contract stops and rolls back (just like your car when it’s ‘out of gas’).
How gas is priced depends on the global consensus of the community. It’s therefore likely operations that have the best-priced gas will be executed first on the network, and the rest a bit later.
Uploading your contract.
Now that you understand Ethereum’s basic principles, and that you have your first contract written up, it’s time to deploy it on the Ethereum network.
Open up your Alethzero client if you haven’t already done so, and familiarise yourself with the interface. Make sure you have a notepad open with our contract saved inside. For the purpose of this tutorial you should not connect to the Testnet; instead, select ‘Use Private chain’ from the debug menu and create your very own private chain. This way you are not reliant on the testnet being online while you develop your dapps.
Click on the button marked ‘New Transaction’ in the menu bar to bring up the new transaction dialog. This is where you will input your contract code and send transactions, it consists of an address to send transactions to, options for gas and gasPrice, and a pane for inputting contract code or transaction data. Close this for now.
As mentioned previously, saving this contract or operating it will require ether, which at the moment we have 0 units of. In order to acquire a bit of ether, you need to participate in the voting process that guarantees the integrity of the decentralised database, a process referred to as ‘mining’.
You are not connected to the network in this case as you are running a private chain, so only you can mine for new blocks. Click on ‘Mine’ in the toolbar – then go to Debug and select ‘Force Mining’. You should start seeing various tabs come alive with information. The mining tab has a visual representation of the mining of a block – when a successful block is found a red spike marks it and your balance should increase. An interesting tab to have a look during this process is the ‘Blockchain’ one – each vote is recorded here and tagged with a number. We’ll get back to this shortly.
Once you are the proud holder of say 15000 Finney’s, you can stop mining. Click ‘mine’ again to stop the process. Now let’s Deploy our contract.
Reopen the ‘New Transaction’ popup and copy and paste the solidity we wrote earlier within the ‘Data’ textbox. It should look a bit like this:
 Since we are trying to create a contract and not send ether to another account, you can safely leave all the fields to their default value. We’ll be sending 10,000 gas to the contract priced at 10 Szabo each. An Szabo is another unit of value, equivalent to 0.000001 ether. Since our contract creation code is so simple, we’ll be refunded of the majority of this ether as the saving of the contract will not consume all the gas.
If you have any compile errors you may not have copied the contract correctly – the debugger should give you the line and character if it has found an error. If you have pasted the contract correctly, you should two messages in the pane just under your contract code. The first one titled ‘Solidity’ contains what looks like a JavaScript snippet(which we will not be needing today), a list of all executable functions within the contract, and most importantly for us the ABI (Application Byte Interface) of our function ‘sendCoin’. Take this information and copy it to a notepad as you will need it in a moment. The second is a series of assembly-like instructions similar to ‘PUSH2 0x27 0x10 CALLER…’. This is your contracts EVM code, in its compiled form.
Now that your contract is compiled, you just have to press the ‘Execute’ to deploy your contract in the decentralized database.
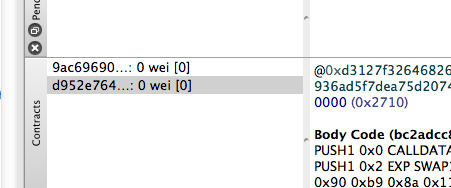
Since you shouldn’t be mining, it’s likely your contract creation will land in ‘Pending’. Make sure you have the ‘Pending’ pane open and you will see something like this: 
After pressing ‘Execute’ in the transact pane make a quick note of the ‘creates’ field for that particular transaction in the ‘pending’ pane, in this particular case, ‘1f530b6b…’ (it will be different for you, as each contract created has a unique ID).
Now that you have a pending contract you will need to commit this to the blockchain by mining a block (On a live network anyone else mining will receive this transaction and attempt to include it in the mining of a successful block). Click mine and wait for the transaction to disappear from the pending pane and for a new entry to appear in the ‘contract’ pane. Turn off mining again and click into your new contract in the contract pane. You should see something like the below:

You can see the entry in your contracts data storage from your initial setup showing a key value pair of the SHA3 of your public address and the number ‘10,000’. Everything looks good so we can assume that at the very least our constructor function has been run correctly. Now we wish to test if we can send our tokens to another public key; In order to run our function sendCoin we need to send a transaction to the contracts address specifying a ‘To’ address, a ‘value’, and importantly: A function ID in the transactions data array. Locate the transact pane and paste the contracts address into the ‘Address’ box:

Now in the area where we previously input our code we are going to put first the function id and a recipient address and a value on separate lines. When you sent the contract to the network earlier you should have stored the function ID ‘sendCoin’. Use 0xec6d9353ca85eb80076817fa989f8825e136d55d (my public address on the testnet :p) and any value lower than 10,000. The data should look something like this:
$0x90b98a11

0xec6d9353ca85eb80076817fa989f8825e136d55d

500
Every time you call a function in a contract it will take this form – the 4 byte function ID followed by the functions argument(s) which are padded to 32 bytes automatically. You will see more examples of this in later tutorials.
Click Execute and you should once again see a transaction pending, hit ‘mine’ until you’ve generated a new block and then stop mining. Your contract should now look something like this:

Finally
And that is it – you have created your first contract! If you’re comfortable with what we have covered here – why don’t you try and add the contract to the test network. Send me some tokens using ‘0xec6d9353ca85eb80076817fa989f8825e136d55d’ and ping me on twitter @kapplerken to let me know your contract address so I can send some back!

On OSX (Mountain Lion) the copy/pasting of the contract’s address doesn’t work. Alternatively the address can be found in the transaction details in the block chain pane, under ‘creates’. However, copy/pasting from there doesn’t work either so you have to manually copy/type the address into the ‘To’ of the ‘New transaction’ pane.
First few chars of address in ‘contracts’ pane:
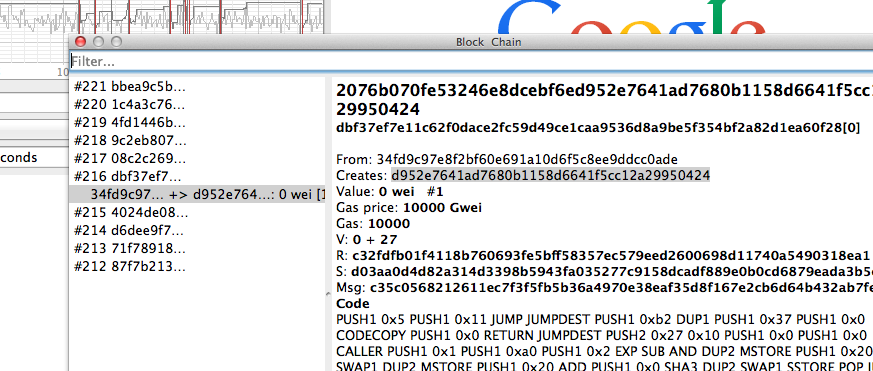
Full address in block chain pane:
LikeLike
I’m experiencing the same issue in the Windows 7 stable binary. Thank you for posting this, because I was going crazy trying to figure out why I couldn’t copy/paste the contract address, or even view it without having to dive into the blockchain.
I guess for now I’ll manually type and save my contract addresses in a separate text file for easy access, but this is definitely something that will need to be remedied in the future.
LikeLike
Depending on which OS you are on you should be able to double click on the contract to copy it’s address to the clipboard – you can then paste it into a textpad.
Alternatively, find the ‘BlockChain’ pane and locate the transaction which created the contract – inside its details there should be a value called ‘Creates’ which is the address of the contract created.
LikeLiked by 1 person
I’m a bit confused by the function ID here…
So a function should not be called with its name, but rather by just typing in the 8 characters that are shown where the code is compiled in the transaction window? Should it be preceded by a $?
I think it would help to tell the readers of this guide when to store this function ID and how to find it rather than telling them what they should have done…
“When you sent the contract to the network earlier you should have stored the function ID ‘sendCoin’.”
🙂
Thanks for the guide!
LikeLiked by 2 people